From time to time, while working as an Applications Engineer at LORD Corporation, I would get a call from a customer who was concerned the bond would fail on the vibration isolator mounts they were considering using. After all, a vibration mount is a rubber-to-metal bonded product in which an adhesive bonding process is used to manufacture it.
I could easily see how this would be a concern, especially if someone doesn't often deal with metal adhesive or is not familiar with rubber bonding to metal. During these conversations, when I point out LORD uses its Chemlok ® adhesive in the rubber to metal bonding process, the customer is immediately reassured that the bond on a vibration isolation mount is most certainly not the weak link.
The products used for optimal bond strength are superior to any familiar items, like plastic glue, PVA glue, wood glue or epoxy glue. This isn't Gorilla super glue we're talking about. Bonding rubber to metal requires use of a structural adhesive product. It's the best glue for the process.
Want a top-quality and high performing solution for your next application? Download the LORD Catalog!

In this article we’re going to explore the typical 5 step process used and the best way to bond metal to metal or vulcanize rubber to metal.
How LORD Revolutionized the Adhesive Industry
Before LORD's development of Chemlok®, there really was not a dependable method used for rubber to metal bonding. Knowledge of the fundamentals of bonding rubber to metal was lacking. The adhesives being used sometimes functioned like metal glue and had limited process versatility, which resulted in high scrap rates due to poor bond. The mounts for bonding metal or a metal piece had inadequate resistance to water, temperature and stress. A metal surface requires the strongest metal adhesive solutions.
 Image courtesy of LORD Corporation
The LORD Chemlok® adhesive still has a fantastic reputation and is used by LORD Corporation and hundreds of rubber-to-metal bonding companies throughout the world. This is a great testimony to LORD since even some of LORD's competitors who specialize in rubber to metal bonding use Chemlok® as their preferential adhesive.
Occasionally a customer would further question me regarding additional processes used in manufacturing a LORD mount and I would always note that LORD has a diverse product offering. Their array of products have helped engineers in industry areas such as:
- Aerospace and Defense
- Automotive
- Building and Construction
- Electronics
- Industrial Equipment
- Oil and Gas
- Commercial Vehicles
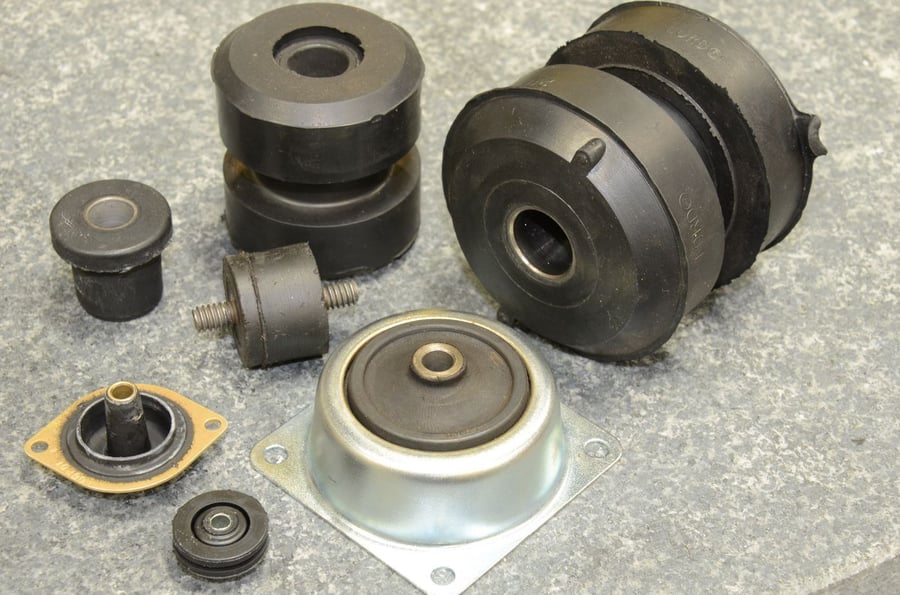
LORD has used literally hundreds of elastomers over the years for rubber to metal bonding applications. There are also multitudes of substrates that LORD has bonded the elastomer to, one being the Chemlok® adhesive process used to bond each specific elastomer type to each specific substrate as well. Since LORD incorporates so many rubber to metal bonding techniques, I always tried to limit the scope of my answer to the elastomers and substrates used in products offered in the LORD Industrial catalog, specifically natural rubber or neoprene bonded to low carbon steel.
I found this easier to explain by breaking down the process into five different sub-topics that include Elastomer Type, Surface Preparation, Primer and Adhesive Application, Molding, and Testing.
5 Steps of Rubber-to-Metal Bonding
1. Elastomer Type
The majority of vibration isolation mounts offered in the LORD Industrial catalog are made using either natural rubber or neoprene.
When LORD receives natural rubber latex or neoprene, various fillers along with other ingredients are added as required per the specific recipe needed to get the desired properties of the natural rubber or neoprene to be used. I like to compare this to mixing-up a cake batter (except the outcome is something like a multipurpose adhesive). The rubber is then fed through rollers so that all the ingredients are uniformly dispersed throughout the rubber. The mixed rubber then comes off the rollers and is made into pellets if the rubber will be used in transfer molding or strips if the rubber will be used for injection molding. The rubber is then stored in a climate controlled room where it will eventually be used in the molding process. Natural rubber or neoprene in this condition is considered to be in an uncured state. These rubbers will not exhibit any of their characteristics until they go through the curing process during molding.
.png?width=838&name=Untitled%20design%20(6).png "Untitled design (6).png") I Images courtesy of LORD Corporation
I Images courtesy of LORD Corporation
Natural rubber latex is harvested from the Hevea brasiliensis tree which grows in many countries that have tropical climates. After the vulcanization process or curing, natural rubber has the best mechanical characteristics such as tensile strength, abrasion resistance, tear strength, impact resistance and durability of any elastomer that LORD offers. It can be used in environments where temperatures range from -40 degrees F to 190 degrees F.
Neoprene is a synthetic elastomer that is produced by polymerization of chloroprene. After the vulcanization process, the mechanical characteristics of neoprene are close in comparison to those of natural rubber. However, neoprene offers better oil resistance than natural rubber. Neoprene can be used in environments where temperatures range from -30 degrees F to 212 degrees F.
Because of their superior performance characteristics, natural rubber and neoprene are used in most of the products offered in the LORD Industrial catalog.
They are ideally suited to be used for off-highway equipment applications such as engine isolation, cab isolation and auxiliary component isolation. They are widely used for general industrial applications such as compressor, pump, motor, and electronics isolation.
2. Surface Preparation
Many of the products offered in the LORD Industrial catalog are comprised of components made of low carbon steel. Low carbon steel is low cost, easy to machine, and has acceptable tensile and compressive properties that provide good performance in most vibration mount applications. Before being used in the bonding process though, it is essential that the bonding surfaces of the low carbon steel components be properly prepared to provide optimum bond performance. During surface preparation, all oils must be removed from the bonding surfaces either through solvent degreasing methods or by an alkaline cleaning process. In some cases, rust may need to be removed. This can be accomplished by aluminum oxide grit blasting or machining. Once the low carbon steel component has been prepared it should be kept in a clean, low-humidity environment. If the component needs to be handled for any reason, care should be taken so that oils that are on a person's fingers will not cause recontamination of the part. Cotton gloves or a clean rag should be used in handling the part to avoid bond failure and maximize adhesion.
3. Primer and Adhesive Application
After the surfaces of the metal components have been properly cleaned, it's time to apply the adhesive. LORD uses a two-coat adhesive system to bond natural rubber or neoprene to low carbon steel. The two-coat adhesive system consists of a primer layer and an adhesive topcoat. Chemlok® 205/6125 is a good system to use for this. Several methods of applying the primer and adhesive can be used including spraying, dipping, brushing and rolling. LORD uses the spraying process on an automated spray line for production.
In general, the recommended dry film thickness for optimum adhesion and bonding performance is 0.2 to 0.4 mil for the primer and 0.5 to 1.0 mil for the adhesive. It is important to properly agitate the primer and the adhesive prior to and during the spraying process. This allows for settled ingredients to become uniformly dispersed throughout the product during application.
After going through the spraying process, drying can be done at room temperature, or it can be accelerated using a circulating air oven. After the metal components that have been sprayed with primer and adhesive are finished drying, care should be taken when handling so that the adhesive does not become contaminated. Cotton gloves should be used when handling these parts. These finished components should be used in the molding process as soon as possible. This is very important as surface contamination on a part may not be noticed until after the bonded rubber process. It may appear in the form of poor edge adhesion, low part tensile strength or part spring rates that are not to specification. This can result in costly scrap and ultimately remaking parts that should have been made correctly in the first place.
Working with and following the advice of a highly knowledgeable LORD technical representative can greatly enhance your bonding process.
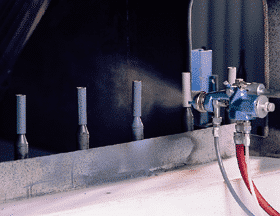 Image courtesy of LORD Corporation
Chemlok adhesive is applied to metal components in an automated spray line
4. Molding
The natural rubber and neoprene products at LORD are normally produced by either the transfer molding process or the injection molding process. LORD does its molding in-house to produce its standard product line.
In the transfer molding process, metal components, which have gone through the two-coat adhesive process, are loaded into a mold that is heated up to as high as 340 degrees F. The metal components are loaded either by hand or by a loading fixture. After the metal components have been loaded, the uncured natural rubber or neoprene pellets are loaded into the heated well pot of the transfer mold. A piston forces the rubber through sprues in the well pot and into the mold cavities which are located directly under the well pot of the mold. When the cavities have been filled the mold is left closed under pressure for the period of time required to cure the particular elastomer. This is usually around 15 minutes but can range higher or lower depending on the molding temperature, size of the part, and elastomer used. During molding the adhesive on the metal components reacts to the molding temperature, pressure, and the elastomer viscosity to provide an intimate bond between the elastomer and the metal component. After curing, the mold is opened and parts are removed. Flash is trimmed from the parts, the cull pad which is the cured rubber left in the well pot, is removed and the mold cavities are cleaned in preparation for the next molding cycle.
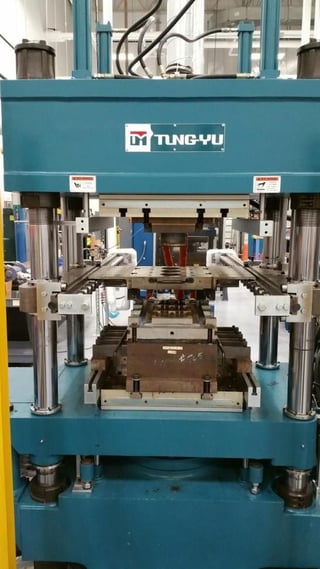 Image courtesy of LORD Corporation
Transfer Molding Press
The injection molding process is very similar to the transfer molding process. The metal components are loaded in a similar fashion as in transfer molding. The curing and bonding processes that occur in the mold are similar as well. The main difference between transfer and injection molding is that in injection molding a continuous strip of uncured rubber is automatically fed into the injection molding machine, injected through a nozzle, routed through a runner system, and then into the cavity. As in the transfer molding process, after curing is completed, the mold is opened and parts are removed. Flash is trimmed from the parts, the cured rubber in the runners is removed and the mold cavities are cleaned in preparation for the next molding cycle.
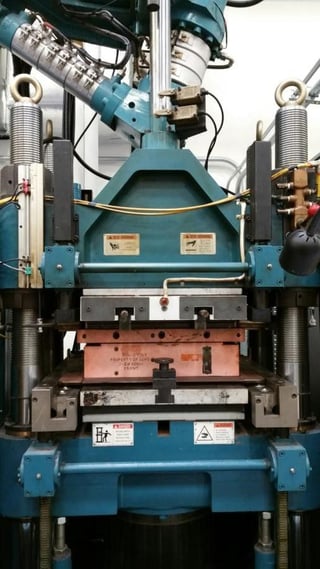
Image courtesy of LORD Corporation
Injection Molding Press
Throughout the molding process the press operator visually inspects the molded parts as they come out of the mold for any imperfections such as air trap, knit lines, backrinding, or tearing that could be a cause for rejection.
The operator has a highly trained team consisting of technicians, manufacturing engineers, tool engineers, quality engineers and design engineers at his/her disposal to help with any issues that should arise. If the operator notices anything unusual they can stop the molding process and get the appropriate people involved to resolve any issue.
5. Testing
After the molding process has been completed, testing of one or more samples of the production lot is required. In most cases a part is broken and must meet specific tensile strength requirements. The break should be through the rubber and not in the bond. A load-deflection test may also be performed to assure that the spring rate of the mount is to specification. The parts are sent to the customer only after the testing is completed and the parts are deemed acceptable. Using mechanical fasteners, epoxy adhesives or even the strongest glue won't achieve optimal results. The focused steps detailed above address case-by-case needs and result in super glue-like strength, with a lot more complex chemistry thrown in.
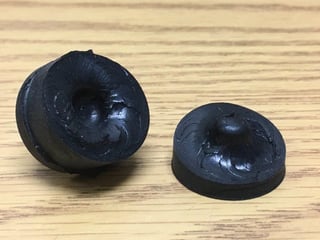
Image courtesy of LORD Corporation
Sample showing a 100% rubber break
Summary
To consistently exceed the highest quality standards, LORD meticulously adheres to the five steps of elastomer preparation, surface preparation, primer and adhesive application, molding, and testing for every rubber-to-metal bonded part that it produces. In 1956, LORD revolutionized the industry with its development of Chemlok® to ensure exceptional bonding and performance. It is a great testimonial to the quality products that LORD provides and why it continues to be recognized as the leader in this industry over 60 years later.
See how their unique process and products can help you provide a top-quality and high performing solution for your next application: